How to Build a Custom, Multi-Level Bin Cage from Scratch
Have you ever felt that standard mouse cages limit your pets’ natural curiosity and need to explore? I’ve been there too, watching my own mice crave more vertical space and enrichment. This guide will show you exactly how to construct a personalized habitat that transforms a simple bin into a mouse paradise.
You will receive clear, step-by-step instructions that make the process straightforward and rewarding. We will cover selecting the perfect bin, safely cutting openings, adding secure levels, and ensuring proper ventilation for your mice’s health and happiness.
Why Build Your Own Multi-Level Bin Cage Instead of Buying One?
Commercial cages often fall short for our small, intelligent friends. They can be poorly ventilated, have bars spaced too widely, or lack the vertical space mice adore. Building your own habitat gives you complete control over the layout, security, and features that matter most for your pets’ wellbeing.
From a financial perspective, a custom bin cage is remarkably cost-effective. I’ve constructed spacious, multi-level palaces for a fraction of the price of a large, branded tank topper. You are investing your creativity, not a fortune, to achieve a superior living environment.
Durability is another significant advantage. Many store-bought cages use thin plastic bases that can be chewed through, or wire floors that are uncomfortable for tiny feet. A heavy-duty storage bin provides a deep, secure base for burrowing and is far more resistant to determined chewers like my adventurous Kenny.
The ability to customize is the ultimate reward. You can design the interior to suit your mice’s unique personalities. My older mouse, Gregory, appreciates wide, stable platforms, while Jeffery loves having multiple little hideouts tucked into corners. You become the architect of a world perfectly tailored to your pets’ instincts and quirks.
What Materials and Tools Do You Actually Need?
You do not need a workshop full of professional tools. With a few key items, you can create a safe and stunning home. Gathering the right supplies before you start is the first step to a successful and stress-free build.
- Primary Tools: A power drill, a box cutter or utility knife, and a pair of sturdy wire cutters.
- Measuring & Marking: A tape measure and a permanent marker are indispensable for planning your cuts.
- Fastening Essentials: You will need a good amount of zip ties (cable ties) and a roll of strong, non-toxic aquarium-safe silicone sealant.
- Safety Gear: Do not forget work gloves and safety glasses. Cutting plastic and metal mesh can create sharp edges and flying bits.
Choosing the Right Storage Bins for Mice
The bin is the foundation of your entire project. Not all plastic storage totes are created equal for this purpose.
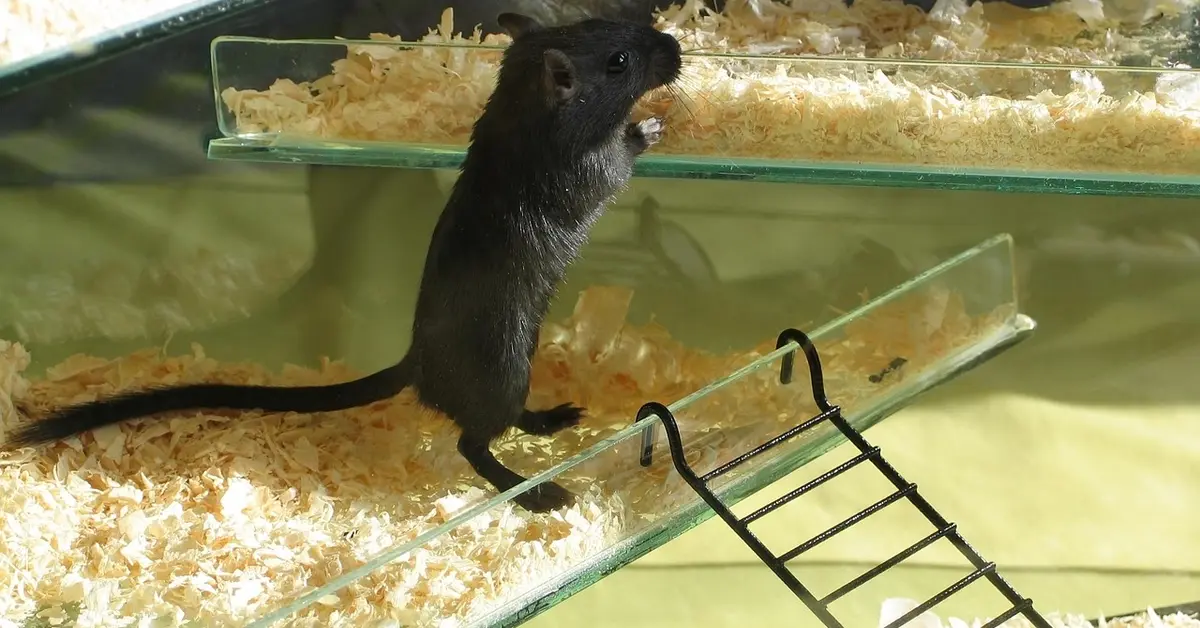
- Size and Shape: Look for a bin that is both wide and tall. A tall, clear bin is ideal for creating multiple levels. A minimum of 20-gallon capacity is a good starting point for a small group, but bigger is always better.
- Material and Transparency: Choose a bin made of clear, smooth, and sturdy plastic. Thin, cloudy plastic can be easily chewed and makes it difficult to observe your pets. The smooth sides also prevent mice from getting a grip to climb and escape from the top.
- Lid Design: A lid that fits securely and has a flat, reinforced surface is perfect for attaching your ventilation panels. Avoid bins with overly complicated or flimsy latch mechanisms.
Hardware Cloth vs Mesh: What Works Best for Ventilation?
Proper airflow is non-negotiable for mouse health, preventing the buildup of ammonia from urine. The material you choose for ventilation holes is critical.
¼-inch hardware cloth (a stiff, welded wire mesh) is my top recommendation for any major ventilation panel. The holes are far too small for a mouse to squeeze through, even a young one. It is incredibly sturdy, resistant to chewing, and provides maximum air circulation. I use it for all the large openings on my cages, especially when mouse-proofing areas at home.
Fine fiberglass or aluminum window screen mesh is useful for smaller, secondary areas where you want to prevent bedding from being kicked out. While it offers excellent airflow, it is not chew-proof and should never be used as the primary barrier anywhere a mouse can reach it. I might use it to cover a small gap, but it is not a substitute for hardware cloth.
The choice ultimately comes down to security versus convenience. Hardware cloth requires more effort to cut and fasten but provides permanent, worry-free ventilation. Softer meshes are easier to handle but are a temporary solution at best for our clever, nibbling companions.
How Do You Plan Your Multi-Level Layout?
How Much Space Do Your Mice Actually Need?
While the general rule is a minimum of 20 gallons for a small group, floor space is only part of the story for active mice. Think of your cage not as a single room, but as a multi-story apartment building where vertical space is prime real estate. My mice, like the energetic Kenny, use every level for different activities—sleeping up high, foraging in the middle, and burrowing below. The “minimum 20 gallons” guideline is a starting point, not a guarantee—layout, enrichment, and vertical usable space matter just as much. Don’t be fooled by myths that floor area alone determines a mouse’s well-being.
To calculate usable space, measure the bin’s footprint and multiply it by the number of solid levels you plan to install. A 110-quart bin might have 360 square inches of floor space; adding two full levels effectively triples that area. Focus on creating distinct zones for sleeping, playing, and eating to prevent territorial squabbles and encourage natural behaviors.
- Sleeping Zone: A quiet, enclosed space on the highest level, away from main traffic.
- Foraging Zone: Scatter food and hides across middle platforms to stimulate exploration.
- Burrowing Zone: Leave at least 6 inches of substrate depth on the main floor for digging.
How Do You Cut Ventilation Holes and Access Points?
A soldering iron is my tool of choice for this task, as it melts clean holes without creating sharp, dangerous edges. Melting the plastic is far safer than cutting it, preventing accidental injuries from jagged shards that can harm delicate feet and whiskers. I work in a very well-ventilated area to avoid inhaling fumes, making slow, deliberate circles to form each opening.
Ventilation should cover at least one full side of the bin from the substrate line upwards. Stagger the holes in a grid pattern rather than straight lines to ensure excellent cross-ventilation and prevent stagnant air pockets. This design mimics a natural breeze, keeping the air inside the habitat fresh and healthy for sensitive respiratory systems.
Creating Safe Entry Doors for Easy Cleaning Access
A large, hinged door on the lid or upper side wall transforms cage maintenance from a chore into a simple task. I design my main access door to be large enough for my entire hand and a small dustpan to fit through comfortably, making spot-cleaning a breeze. This prevents the need to lift the entire habitat apart for routine upkeep.
I use small cable ties as robust, inexpensive hinges. After cutting three sides of the door panel, I melt pairs of holes along the uncut edge and the corresponding bin wall, threading the ties through to create a secure pivot. Always add a simple latch, like a sliding cabinet bolt, to ensure curious and clever mice like Kenny can’t nudge their way to freedom.
- Mark a large rectangle on the lid or upper side wall.
- Use your soldering iron to melt through the plastic along three sides, creating a flap.
- Melt pairs of small holes along the hinged side of the flap and the bin.
- Thread cable ties through the holes to form the hinge, snipping off the excess.
- Install a small latch on the free side of the door to keep it securely closed.
How Do You Attach Hardware Cloth Securely?
Hardware cloth with 1/4-inch mesh is the only safe option, as wider spacing can trap heads and limbs. Wear sturdy work gloves while handling the mesh to protect your hands from the sharp, freshly cut wires that can cause surprisingly deep cuts. I cut my panels slightly larger than the openings they will cover to ensure full coverage.
My preferred attachment method is using nickel-plated fender washers and machine screws. The wide surface area of a fender washer distributes pressure evenly, preventing the plastic from cracking under stress and creating a rock-solid hold that lasts for years. I place a washer on both the inside and outside of the bin for a perfectly secure, double-locked panel.
- Cut hardware cloth to size using tin snips, wearing thick gloves.
- Hold the mesh over the ventilation hole and mark screw points with a marker.
- Pre-drill small pilot holes at your marks to make screwing easier and prevent cracking.
- Place a fender washer on a machine screw, push it through the bin and mesh, and secure with another washer and nut on the inside.
- Tighten until the mesh is taut, but be careful not to overtighten and strip the plastic.
How Do You Build and Connect Multiple Levels?
Making Ramps That Your Mice Will Actually Use
Building a ramp that looks good is one thing; creating one your mice will confidently use is another. I learned this the hard way when one of my first ramps was completely ignored. The secret lies in providing a surface their tiny feet can grip without slipping. A smooth plastic ramp is like an ice rink to them, so covering it is non-negotiable.
You have several excellent options for creating a grippy surface. I prefer to use a low-pile carpet runner, which you can cut to size and secure with non-toxic aquarium silicone. Other great choices include attaching strips of fleece with zip ties poked through the plastic, or even using a coarse sandpaper for a more rustic, file-down-their-nails approach. Whichever material you choose, ensure it’s securely fastened so curious paws can’t peel it up.
The angle of your ramp is just as critical as the texture. A steep incline will intimidate even the boldest mouse. Aim for the gentlest slope you can manage within the confines of your bin. You can achieve this by positioning your platforms thoughtfully or by creating a zig-zag ramp system that breaks up the descent. My mouse Kenny, the adventurer, will tackle anything, but my more cautious fellow Gregory appreciates a leisurely, well-graded climb.
- Surface Textures: Low-pile carpet, fleece, or coarse sandpaper.
- Secure Attachment: Use non-toxic aquarium silicone or zip ties.
- Ideal Slope: Gentle and manageable, not a sheer drop.
- Ramp Width: Make it wide enough for two mice to pass comfortably.
Creating Stable Platforms and Ledges
Wobbly platforms are a deal-breaker for mice. These are prey animals, and an unsteady floor creates constant stress. Your platforms must feel like solid ground, bolted firmly to the cage walls. I use a combination of zip ties and plastic cable clamps, which you can hot-glue to the bin for an unshakable anchor point.
For the platforms themselves, you can repurpose plastic canvas, which is lightweight and allows droppings to fall through, or use untreated, mouse-safe wood like basswood or aspen. Wood provides a fantastic natural material for them to gnaw on, serving a dual purpose. Just be sure to sand any rough edges to prevent tiny splinters.
When planning your layout, think about the journey. Don’t just place platforms randomly. Create a logical flow that encourages natural behaviors like climbing, exploring, and resting. I always include at least one larger platform that can serve as a communal sleeping area or a dining spot, which has become a favorite for my trio to share crumbs together.
- Sturdy Materials: Plastic canvas or untreated, sanded wood.
- Secure Mounting: Use zip ties anchored with cable clamps or brackets.
- Functional Layout: Design a flowing path, not a random assortment.
- Multi-use Spaces: Incorporate larger ledges for sleeping and eating.
How Do You Secure the Top and Prevent Escapes?
Double-Checking Every Potential Escape Route
A mouse can fit through a hole the size of a dime, and their determination to explore is boundless. The moment you think your cage is secure is the moment you need to check it again. I start by running my finger along every seam, edge, and hole I’ve drilled, feeling for any gap that seems too large.
Pay special attention to the corners where the wire mesh meets the bin walls. This is the most common failure point. I use extra zip ties at each corner and midway along each side, pulling them as tight as possible without cracking the plastic. For added insurance, a thin bead of hot glue along the inside edge of the mesh where it contacts the bin can seal any micro-gaps that might exist.
Never underestimate the lid. A standard bin lid is not enough on its own. Your primary defense is the hardware cloth top you’ve built, and it must be physically secured to the bin itself. I attach mine with heavy-duty zip ties fed through holes drilled just below the bin’s lip. For my most ambitious climber, I’ve even added simple clasps to the front, ensuring the top can’t be lifted from the inside, no matter how much they hang on it.
- The Dime Test: If a dime can pass through, so can a mouse.
- Reinforce Corners: Use multiple zip ties at all mesh-to-bin junctions.
- Seal Micro-Gaps: A bead of hot glue provides a final barrier.
- Lid Security: Secure the mesh top with zip ties and consider adding clasps.
What Bedding and Setup Works Best in Bin Cages?
Choosing the right bedding transforms your bin cage from a simple container into a cozy, stimulating home for your mice. Proper bedding supports natural behaviors like burrowing and nesting, which reduces stress and keeps your pets active and happy. I have experimented with many types over the years, and the depth and material make a huge difference in how my mice interact with their space. You can find a detailed guide on mouse bedding substrates to help you make an informed choice.
Selecting the Ideal Bedding Material
Not all beddings are created equal—some can be dusty or hold too much moisture, leading to health issues. I always opt for dust-free, absorbent options that allow my mice to dig and tunnel without respiratory risks. Below are my top picks for the best dust-free beddings for mice, chosen for low dust levels, high absorbency, and safety. Here are the top choices I recommend based on safety and functionality:
- Aspen shavings: These are my go-to because they are affordable, low-dust, and hold burrows well. Avoid pine or cedar, as their oils can irritate mice lungs.
- Paper-based bedding: Soft and highly absorbent, this type is excellent for nesting. I use unscented varieties to prevent any chemical exposure.
- Hemp or cardboard blends: These eco-friendly options are great for odor control and provide a sturdy base for climbing structures.
Setting Up Layers and Enrichment
Mice thrive in environments that mimic their natural habitats, so layering bedding and adding hides encourages exploration. I aim for at least 2-3 inches of bedding depth to let my mice, like the adventurous Kenny, dig elaborate tunnels and nests. Deep bedding supports natural burrowing behavior, which is important for their physical and mental health. Spread it evenly across all levels, but add extra in corners where they prefer to sleep.
- Place small cardboard boxes or PVC pipes as hides on each level-this gives shy mice like Jeffery safe spots to retreat.
- Incorporate foraging toys: Scatter treats like sunflower seeds or crumbs in the bedding to stimulate their sense of smell and keep them busy.
- Use platforms or ramps lined with safe materials to prevent slips, and ensure bedding doesn’t block ventilation holes.
How Do You Maintain and Clean Your Multi-Level Bin Cage?
Regular upkeep keeps your bin cage fresh and prevents odors or bacteria buildup. Establishing a consistent cleaning routine helps your mice feel secure because sudden changes can stress them out. I clean my cages weekly, with deeper monthly sessions, and I have noticed that Gregory, my calm older mouse, appreciates the predictability. I also do quick daily spot‑cleans and refresh food and water to keep things tidy between full cleans. Breaking tasks into daily, weekly, and monthly chores keeps the routine manageable and predictable for the mice.
Weekly Cleaning Steps
Focus on high-traffic areas and soiled spots to maintain hygiene without overwhelming your pets. Spot-cleaning daily and a thorough weekly wipe-down extend the time between full cleanings and keep the environment stable. When choosing cleaners, opt for pet-safe disinfectants specifically labeled for cages and enclosures to avoid harmful fumes or residues. Below are top-recommended pet-safe disinfectants for cages and how to use them safely.
- Remove and replace soiled bedding in corners and under ramps-mice often use the same spots for waste.
- Wipe down plastic surfaces with a vinegar-water solution (1:1 ratio) to disinfect without harsh chemicals.
- Check and clean food dishes, water bottles, and toys to prevent mold or debris accumulation.
- Rearrange a few accessories slightly to provide novelty, but keep major structures in place to avoid disorienting your mice.
Deep Cleaning and Multi-Level Care
Every 4-6 weeks, do a complete teardown to ensure all levels are sanitized. Deep cleaning prevents long-term odor and allows you to inspect the cage for any wear or damage. Multi-level setups require extra attention to connectors and hidden areas where mess can accumulate.
- Disassemble levels carefully, labeling parts if needed, and soak plastic pieces in warm, soapy water.
- Scrub ramps and platforms with a soft brush to remove stuck-on debris, then rinse thoroughly and air-dry.
- Replace all bedding and sanitize hides and toys-this is a good time to introduce new items for enrichment.
- Reassemble the cage quickly to minimize your mice’s time in a temporary holder, and return some old bedding to maintain familiar scents.
Frequently Asked Questions
How do I make a DIY bin cage for mice?
To create a DIY bin cage for mice, begin by choosing a large, clear storage bin (at least 20 gallons) to allow for multi-level setups. Focus on safety by cutting ventilation openings with a soldering iron to avoid sharp edges, and always use 1/4-inch hardware cloth for covering to ensure proper airflow and prevent escapes. Then, install stable platforms and ramps with non-slip surfaces, securing everything firmly with zip ties and checking for any gaps where mice could squeeze out.
How do I make a DIY bin cage lid?
For a secure DIY bin cage lid, repurpose the existing bin lid by attaching a cut-to-size panel of 1/4-inch hardware cloth using machine screws and fender washers to distribute pressure and prevent cracking. Drill small holes around the lid’s edge to thread heavy-duty zip ties, anchoring the mesh firmly, and add a simple latch or clasp for extra security to keep curious mice from lifting it open.
How do I make a DIY bin cage without mesh?
If you prefer to avoid mesh, you can provide ventilation by drilling numerous small holes (no larger than 1/4 inch in diameter) closely together on the upper sides and lid of the bin using a power drill. This method allows for airflow but requires careful spacing and more holes to achieve adequate ventilation, and it may be less effective at deterring persistent chewers compared to hardware cloth.
Your Path Forward
Creating a multi-level bin cage is a rewarding project that transforms a simple storage container into a dynamic home for your mice. With careful planning and safe materials, you can design a space that supports climbing, hiding, and natural exploration, all while keeping your pets secure and content. Follow a step-by-step DIY bin cage guide to walk you through choosing materials, cutting openings, adding ventilation, and assembling levels. The clear, practical steps make it easy to build a safe, comfortable habitat for your mice.
I’ve seen firsthand how setups like this bring out the best in mice—my own curious Kenny darts up ramps with glee, while quieter pals find cozy nooks. Trust that your dedication will lead to a thriving, enriched environment where your mice can live out their playful, curious natures every single day. Play and toys tap into core mouse psychology—encouraging exploration, problem-solving, and social interaction. Simple, varied enrichments reduce stress and help mice engage more with each other and their surroundings.
Further Reading & Sources
- 9 DIY Hamster Bin Cages You Can Make at Home (With Pictures) | Hepper Pet Resources
- Bin – California Hamster Association
- Hamster “Bin Cage” Tutorial : 9 Steps – Instructables
Isabella is a passionate small pet enthusiast with over 8 years of experience in caring for mice. She loves sharing practical tips and heartfelt stories to help fellow mouse owners provide the best care for their tiny companions.
Cage Types